Pumpkin Carving
How Do You Make a Pumpkin Carving Stencil That Won’t Fall Apart?
A strong pumpkin stencil keeps every retained island connected. Use this cut-plan audit to add bridges, simplify fragile details, print at the intended size, and transfer the pattern.
By Vigneshwaran Vijayakumar, Developer and Publisher | | Reviewed under the ClockTools editorial policy

Table of contents
A pumpkin carving stencil stays intact when every area you plan to keep is connected to the rest of the pumpkin face. Any retained shape completely surrounded by cuts is an island. Add a retained strip—a bridge—from that island to the surrounding surface, or redesign the opening so the detail is no longer enclosed.
That is the first test. The second is scale: a bridge that looks substantial on screen may become a sliver after printing. Set the intended stencil width, inspect the black-and-white stencil view, run the advisory cut check, and make a small paper test before cutting the pumpkin.
Open the ClockTools Pumpkin Carving Stencil Generator. The live capture below shows the Design tab with a custom pumpkin face, BOO lettering, and editable feature choices. It does not show a cut-check result. For the connectivity audit, switch to Stencil; its legend is literal: black means cut out; white means keep.
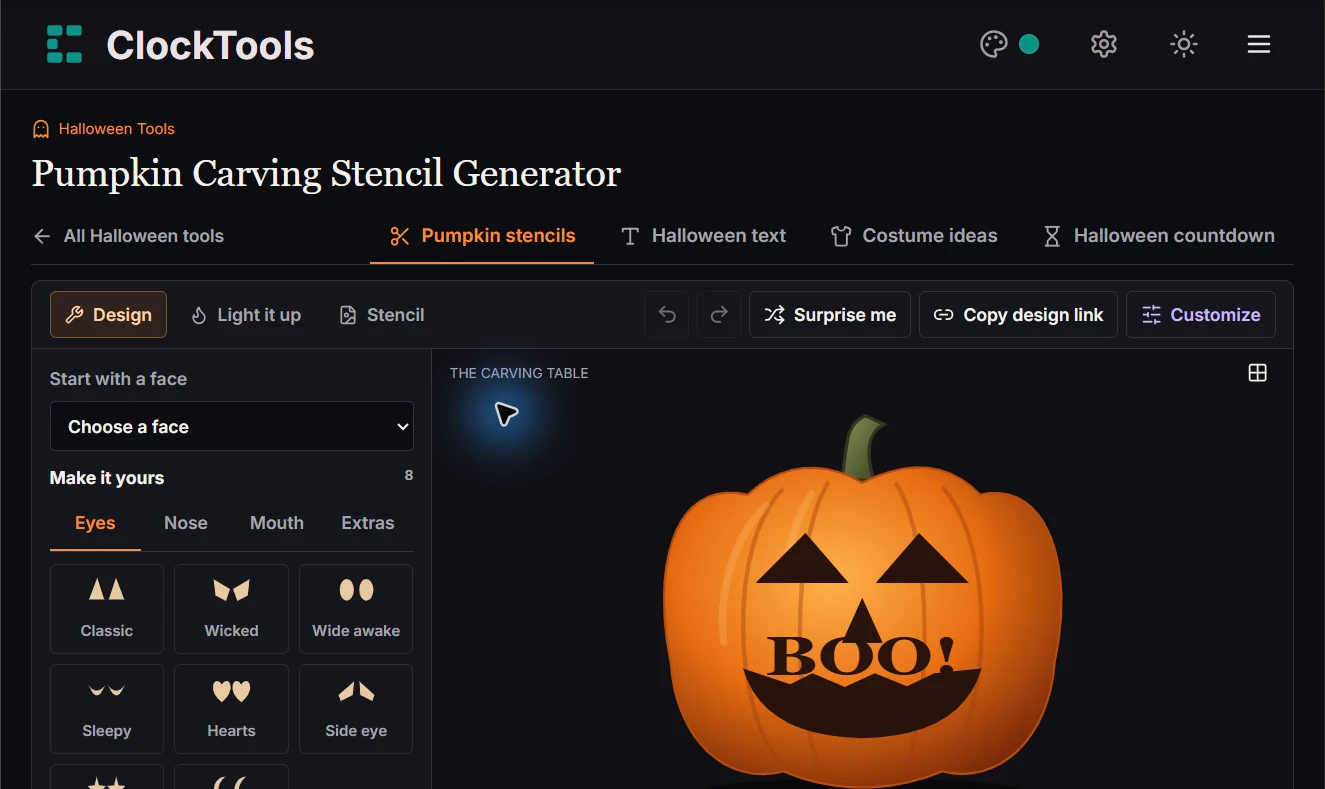
What makes a pumpkin stencil fall apart?
Imagine cutting the letter O as one uninterrupted ring. The centre looks like material you want to keep, but every edge around it is a cut. Once the ring is complete, that centre has no connection to the outer surface. It is an island, so it can come away.
Eyes, pupils, teeth, nostrils, lettering counters, spots, and shapes inside other shapes can create the same problem. The question is not whether an element appears visually centred. Ask: Can I trace a path through retained material from this detail to the outer pumpkin face? If the answer is no, the design needs a bridge or a different cut boundary.
Stencil typefaces solve this mechanically by interrupting enclosed counters. Microsoft’s overview of the Stencil typeface explains that cuts through the letterforms allow enclosed counters to remain rather than becoming solid blobs. Silhouette’s official stencil-letter guidance uses the same island-and-bridge language for physical stencil projects.
How do you find islands before cutting?
Audit the pattern in the same polarity you will carve. In ClockTools, choose Stencil, then read black as opening and white as retained pumpkin. Do not judge connectivity from the orange pumpkin preview or the glow preview; those views help with appearance, not the cut plan.
Use this three-pass check:
| Pass | Question | Repair if the answer is no |
|---|---|---|
| Connectivity | Can every white detail reach the surrounding white surface? | Add a bridge or open a different part of the black shape |
| Scale | Is the connection still obvious at the intended printed width? | Enlarge the pattern, widen the retained strip, or remove detail |
| Sequence | Can delicate areas remain supported while neighbouring cuts are made? | Change the cutting order or divide a large opening into smaller cuts |
Then select Check the cuts. The tool samples a flat raster preview and flags retained regions it sees as disconnected. If it finds an area, it may offer Add suggested bridges. Treat that suggestion as a starting point, not an automatic approval: inspect where the bridge lands, run the check again, and review the printed design.
Where should a bridge go?
A useful bridge connects the island by the shortest visually acceptable retained route while preserving the expression of the design. It should not cross a pupil, turn a tooth into an unrecognizable block, or create a paper-thin neck beside another cut.
The diagram below separates the three states. On the left, the white centre is enclosed by black and would detach. In the middle, the labelled white strip interrupts the cut. On the right, the retained centre has a continuous path to the surrounding material.
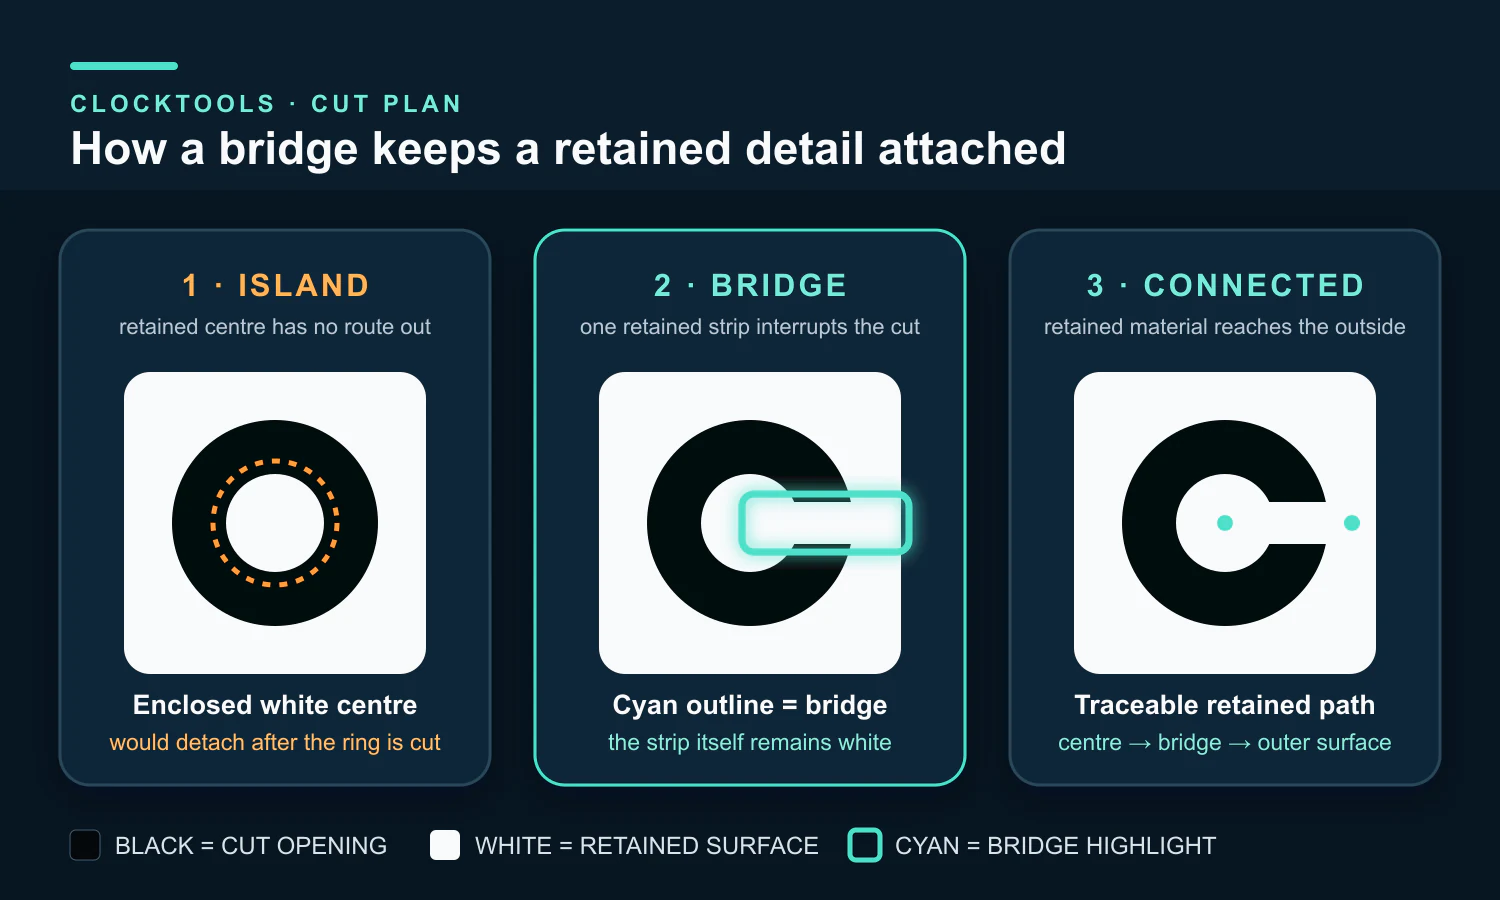
Every line in that diagram has one job: the black region marks the planned opening, the white region marks retained material, and the single connector labelled “bridge” shows the physical path holding the centre. It is not a decorative arrow and it does not claim a universal minimum width.
When several bridge positions work, prefer one that follows an existing edge or shadow. A bridge beside the corner of a mouth may be less noticeable than one across the middle of a smooth curve. For paired features, such as two eyes, mirror the bridge logic only when symmetry improves the face; structural connection matters more than perfect visual symmetry.
How wide should the printed stencil be?
Choose the width from the pumpkin, not from the screen. Measure the reasonably flat front area where the design will sit. Leave space around the pattern so its outer cuts do not approach a sharply curving side or the opening at the top.
ClockTools accepts a stencil width from 75 to 330 millimetres and can tile the output across A4 or US Letter paper. Those are output controls, not a promise that every design will carve well at every allowed size. A detailed face at the minimum allowed width may need simplification; increasing the width makes the same bridge and tooth physically larger.
After printing, measure the ruler or another known dimension on the sheet. If the browser or printer used “Fit to page,” the physical stencil may not match the selected width. Correct the print scale before transferring it. When the design spans tiles, follow the printed overlap instruction: match the repeated artwork on adjoining tiles, then tape the sheets together without stretching or misaligning the pattern.
How do you transfer the pattern without changing it?
Keep a copy of the approved cut plan visible while you transfer. Tape the paper over the chosen pumpkin face, smoothing it in small sections rather than forcing the whole sheet flat across the curve. On a strongly curved surface, make relief cuts in the blank paper margin—not through the stencil—to let the sheet overlap without distorting the artwork.
Mark the boundary with closely spaced transfer points or another method appropriate to your tools. Pause at each bridge and confirm that its two ends are marked as retained material. A bridge accidentally traced as part of the cut opening defeats the structural repair.
Before removing the paper, label ambiguous regions CUT or KEEP in the margin and compare them with the black-and-white screen view. If you want matching words for a party sign rather than cut lettering on the pumpkin, the Halloween Text Generator is a separate poster workflow; it should not be treated as a cut-ready stencil.
Which parts should you carve first?
Work from small internal openings toward larger surrounding cuts. That sequence leaves more material in place while you handle the delicate details. Do not complete a large boundary and then rely on a narrow nearby bridge to support every subsequent cut.
A practical order is:
- Confirm the transferred cut/keep polarity and every bridge.
- Open small interior details while their surrounding area is still supported.
- Cut medium shapes, stopping before fragile junctions when necessary.
- Finish the largest openings and outer contours last.
- Remove loose pieces gently; do not force a region that may still contain an uncut connection.
The article is about pattern structure, not tool safety or a structural calculation for pumpkin flesh. Use age-appropriate tools, a stable work surface, and supervision appropriate to the people carving.
What can the ClockTools checker miss?
The checker is an advisory flat-design test. It samples the rendered pattern and looks for disconnected retained regions. According to the tool’s published methodology, small islands can be missed and narrow connections can pass. A result saying “No disconnected areas found” therefore means the sampled preview did not reveal one; it does not certify the physical stencil.
The real pumpkin adds variables that a flat image cannot simulate:
- the printed scale of narrow bridges and tiny gaps;
- curvature that compresses or stretches the transferred pattern;
- wall thickness and variation in the pumpkin surface;
- font substitution or print scaling;
- the size and control of the cutting tool; and
- the order and accuracy of the cuts.
Use the checker to catch an important class of design error early. Then apply the scale and sequence passes yourself. If a region still looks doubtful, simplify it. Losing one small decorative notch is usually better than losing the centre of the eye it was meant to decorate.
How do you light the finished pumpkin more safely?
Pattern integrity and lighting safety are separate decisions. The U.S. Consumer Product Safety Commission’s Halloween safety guidance recommends battery-operated candles and lights instead of open flames. The agency also publishes product recalls, so check current notices and battery compartments when button-cell products may be accessible to children.
Place the pumpkin where it will not create a trip hazard, and keep any light and battery enclosure appropriate for its instructions and environment. If you use a countdown for a carving session or party, configure the Halloween Countdown Timer separately; it does not control or monitor a light inside the pumpkin.
The final pre-cut rule is simple: check connection, check scale, check transfer, then check again after each major opening. That turns a pretty on-screen face into a cut plan you can actually follow.
Frequently Asked Questions
What is an island in a pumpkin carving stencil?
An island is material that is surrounded by cut openings. If nothing connects that retained area to the rest of the pumpkin face, it can detach when the surrounding shape is cut.
What is a bridge in a stencil?
A bridge is a strip of retained material that connects an island to the surrounding retained surface. It interrupts the cut opening so the enclosed detail remains attached.
Does the ClockTools cut checker guarantee that a stencil will work?
No. It is an advisory flat-pattern check. Small disconnected regions can be missed, narrow connections can pass, and the real result also depends on scale, pumpkin curvature, wall thickness, tools, and cutting technique.
Should black or white areas be cut on a ClockTools stencil?
In the ClockTools stencil view, black areas represent openings to cut and white areas represent material to retain. Confirm the legend before printing or transferring the design.
Can a pumpkin stencil be printed across more than one sheet?
Yes. ClockTools supports A4 and US Letter tiled printing for stencil widths from 75 to 330 millimetres. Measure the printed ruler before transferring the assembled pattern.
Is an LED light safer than a candle inside a jack-o’-lantern?
The U.S. Consumer Product Safety Commission recommends battery-operated candles and lights instead of open flames. Keep button-cell products away from children and check relevant recalls and battery compartments.

About The Author
Vigneshwaran Vijayakumar
Founder, Developer and Publisher of ClockTools | Digital Marketing Manager | India
Vigneshwaran is an engineer with decades of technical experience, including professional work as a Digital Marketing Manager in Dubai. His work connects data analysis, search engine optimization, conversion-rate optimization, content systems, visual production, and applied AI and machine learning. At ClockTools, he turns that multidisciplinary experience into focused browser utilities and practical, source-aware guides.